
Getting started with Axelib, a new BaaS
hands on ... !
The article below presents the core concepts of Axelib Platform

Getting started with a cloud solution is not always that simple.
We're going to do our best to make it simple for you to understand how axelib works.
In case you missed our "what is Axelib" article, you can go and and check it out here.
One of the main important concepts of Axelib, the core item, is the project. Everything else is based on the project concept.
A project, is like a box, representing you Application (in terms of backend), and wraps (encapsulates) all of your entities. So, what is an entity ? Like some of the readers may have understand it's a concept representing your relational tables, and data model. These are the 2 most importants concepts about axelib.
To go deeper in the comprenhension of the platform and how to build your own project, we suggset that you take a look at the following steps.
 1. Create a project
As described above, the project is the number one item of your application. To create one, go to the platform with your account (if you don't have any, you can subscribe before). When you create a project, a unique ID is attributed to you. Once your project is created, if you open it, you will be printed a modal window asking you how you want your project API to be accessible, basically the CORS (Cross Origin Resource Sharing). This step is important because, it's up to you to choose to allow/disabllow whatever you need. You have the four following options :
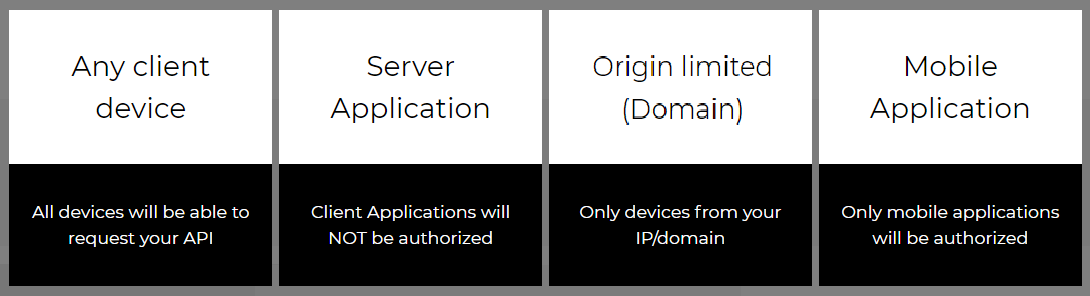 Depending on what is choosed, your API will be reachable only by what you decided (ex: in the case "server application" is choosen, a client based app --JS, won't be able to reach the API). Smart, right ?! - Hell yeah !
In addition to this first and structuring option, you will have a lot settings behind the project settings button. We will make a article in the days to come, to cover all of these functionalities specifically.
2. Manage entities
"Everything is Entity" ! This is how you should think ...
Image you app manage articles, with title and content field, then article is an entity. Inside your project, you have a plus button, you can use it to create a new entity.
The next step after your entity is created is to manage the roles. There are 4 default types of roles in Axelib :
In any entity, by default, you will find the 6 following fields : id, date_create, date_update, user_create, user_update and beta. In addition to these fields, you can create custom fields following the patterns bellow :
Standard entities
While creating a project, you have an option under the name of the project (user entity), if you enable it, this will automatically generates a standard entity names user, with a bunch of fields.
3. Run the Backend (REST API)
Once your project and entities created, you are all set. You can use your backend and start testing the Remote database through the REST API.
You can use a tool like Postman to test your backend. Axelib is oriented on methods. Here is how to build your REST API call.
With these two examples of how to create a record and how to retreve a record, you are ready to use Axelib for your own projects. To be able to build more than just this we suggest you to go through our Rest API article and others.
Happy coding, and enjoy our platform ;-)
Gilles Bandza, Founder
In case you missed our "what is Axelib" article, you can go and and check it out here.
One of the main important concepts of Axelib, the core item, is the project. Everything else is based on the project concept.
A project, is like a box, representing you Application (in terms of backend), and wraps (encapsulates) all of your entities. So, what is an entity ? Like some of the readers may have understand it's a concept representing your relational tables, and data model. These are the 2 most importants concepts about axelib.
To go deeper in the comprenhension of the platform and how to build your own project, we suggset that you take a look at the following steps.
Let's say you understand what Axelib is and what it does; you want to build an new application, here we will show you how to proceed.
Axelib platform website is accessible here : https://platform.axelib.io
As described above, the project is the number one item of your application. To create one, go to the platform with your account (if you don't have any, you can subscribe before). When you create a project, a unique ID is attributed to you. Once your project is created, if you open it, you will be printed a modal window asking you how you want your project API to be accessible, basically the CORS (Cross Origin Resource Sharing). This step is important because, it's up to you to choose to allow/disabllow whatever you need. You have the four following options :
- Any client device
- Server Application
- Origin limited
- Mobile Application
In addition to this first and structuring option, you will have a lot settings behind the project settings button. We will make a article in the days to come, to cover all of these functionalities specifically.
2. Manage entities
"Everything is Entity" ! This is how you should think ...
Image you app manage articles, with title and content field, then article is an entity. Inside your project, you have a plus button, you can use it to create a new entity.
The next step after your entity is created is to manage the roles. There are 4 default types of roles in Axelib :
- Admin
- User and owner
- User
- Guest
In any entity, by default, you will find the 6 following fields : id, date_create, date_update, user_create, user_update and beta. In addition to these fields, you can create custom fields following the patterns bellow :
- Text
- Integer
- Float
- Boolean
- Date
- File
- Key
Standard entities
While creating a project, you have an option under the name of the project (user entity), if you enable it, this will automatically generates a standard entity names user, with a bunch of fields.
3. Run the Backend (REST API)
Once your project and entities created, you are all set. You can use your backend and start testing the Remote database through the REST API.
You can use a tool like Postman to test your backend. Axelib is oriented on methods. Here is how to build your REST API call.
Create a record
Let's pretend, you created an entity car, with a field name, you can create a record as following :
URL : https://api.axelib.io/0.1/car
METHOD : POST
DATA :
Retrieve a record
If you want to retrieve the record created previously, in you « car » entity, you can do as the following, using its ID (1) :
URL : https://api.axelib.io/0.1/car/1
METHOD : GET
DATA : -
RESPONSE :
Let's pretend, you created an entity car, with a field name, you can create a record as following :
URL : https://api.axelib.io/0.1/car
METHOD : POST
DATA :
{
    name: "Lamborghini"
}
RESPONSE :
{
    "car": {
        "success": true,
        "message": "Record created on entity : car",
        "id": "1"
    }
}
Note that the ID of the record created is returned into your response (here 1).
Retrieve a record
If you want to retrieve the record created previously, in you « car » entity, you can do as the following, using its ID (1) :
URL : https://api.axelib.io/0.1/car/1
METHOD : GET
DATA : -
RESPONSE :
{
    "success": true,
    "car": {
        "id": "1",
        "beta": "0",
        "date_create": "2019-08-21 22:36:59",
        "user_create": "-1",
        "user_update": "0",
        "date_update": "2019-12-29 03:03:53",
        "name": "Lamborghini"
    }
}
With these two examples of how to create a record and how to retreve a record, you are ready to use Axelib for your own projects. To be able to build more than just this we suggest you to go through our Rest API article and others.
Happy coding, and enjoy our platform ;-)
Gilles Bandza, Founder
Ready to begin?
Start building your realtime experience today.
Start building your realtime experience today.
From in-app chat to realtime graphs and location tracking, you can rely on Pusher to scale to million of users and trillions of messages